A Guide to Applying Microcement on Walls in Your Home
“Quality is never an accident; it is always the result of intelligent effort.” If you’re considering microcement for your walls, this guide shows you exactly how to achieve a durable, seamless finish that looks bespoke and performs brilliantly in real homes. We’ll help you map the spaces and style you want, check the substrate for moisture, movement and flatness, and choose the right tools, materials, and mix ratios for consistent colour and texture. You’ll learn pro‑level prep, from masking to priming and mesh, then master base and finish coats with clear trowel techniques for smooth, clouded or linear looks. Finally, we’ll cover sealing, curing and long‑term care so your walls resist splashes, steam and everyday wear. Straightforward, step‑by‑step and budget‑aware, this is a practical reference you can trust from first measurements to the last protective coat.
Plan Your Microcement Wall Project: Space, Style, and Budget
Start with a blunt audit of your space. Mark the walls and zones you’ll actually coat: splash zones around sinks, shower walls, and any feature walls that need drama. Clock your lighting (downlights will expose sloppy trowel work), ventilation (bathrooms need airflow for curing), and heat sources like radiators or underfloor heating that can speed drying. Lock in a single, clear look before you buy anything: colour tone (warm greige, cool cement grey), texture (smooth, clouded, or lightly veined), and sheen (matt or satin). Save 1–2 reference photos that match your finish so you and any installer speak the same language. Measure properly: total wall area = width × height minus doors/windows. Example: 3.2 m × 2.4 m = 7.68 m²; minus 1.9 m² window = 5.78 m². Plan edges and transitions now—skirting, sockets, switches, external corners, and where you terminate against tiles or paint. Rough, messy edges scream amateur.
Budget like a pro and timebox the process. Split costs by task: surface prep (bonding primer, mesh, filler), materials (base and finish coats, sealer), labour/time, and tools (trowels, mixing paddle, dust extraction). Add a 10–15% contingency for extra sealer, patches, or an extra coat if the substrate drinks. Map a skinny timeline you can actually stick to: Day 0 prep, Day 1 base coat, Day 2 second coat, Day 3 burnish/sand, Day 4 sealer coat 1, Day 5 sealer coat 2, then cure (light use after 48 hours, full cure typically 7 days—no steam showers before that). Keep a one-line Gantt in your notes so trades don’t trip over wet coats. Before you lift a trowel, make a quick Project snapshot to keep everyone aligned:
- Area: total m² after deductions
- Room type: bathroom, kitchen, hallway, living room
- Finish style: colour, texture, sheen
- Budget band: prep, materials, tools, contingency
- Timeline: stage-by-stage windows and cure period
- Before photo: one clear shot of current condition
Audit the Wall Surface: Moisture, Movement, and Flatness Checks
Before you even open a tub of microcement, run a tight audit. Grab a moisture meter and get real numbers: aim for moisture below 3% on cementitious substrates and under 1% CM on anhydrite. No excuses for active leaks, condensation, or damp patches. Scan for structural and perimeter joints and plan to honour existing movement joints; distinguish harmless hairline cracks from live cracks that keep moving. Check flatness with a 2 m straightedge—you want ≤ 3 mm tolerance, mark high and low spots, make sure corners are plumb. Test coatings: do a cross‑hatch adhesion test on paint, strip anything chalky, flaking, or limewash, and key any glossy areas. Identify the substrate properly—plaster, plasterboard, cement board, concrete, tiles—and confirm new plaster pH below 10. If you see salt efflorescence, hollow render, mould, or flexible walls, hit pause and fix it first; microcement won’t save a sick wall.
- Moisture targets: ≤3% cement-based, ≤1% CM anhydrite; zero leaks/condensation.
- Movement: locate and honour joints; treat live cracks; map hairlines.
- Flatness: ≤3 mm under 2 m straightedge; mark highs/lows; verify plumb corners.
- Coatings: cross-hatch test; remove chalky/flaking/limewash; abrade glossy paint.
- Substrate ID: plaster/plasterboard/cement board/concrete/tiles; pH <10 on new plaster.
- Red flags: damp, efflorescence, hollow sounds, mould, flexible walls — stop and remedy.
Go/No‑Go flow: Dry readings within spec? Yes → Any live cracks or unhonoured joints? No → Flatness within tolerance? Yes → Coatings sound and keyed? Yes → Substrate confirmed and pH safe? Yes → Go: suitable for microcement application. If any answer flips to No, that’s a No‑Go until corrected. This punchy checklist saves you from failures like delamination, telegraphing cracks, and blistering, and sets you up for a durable, smooth microcement finish that actually lasts.
3. Tools, Materials, and Mix Ratios: What You’ll Actually Use
Keep it lean, clean, and accurate: the kit you actually reach for on a microcement wall isn’t a van-load. You’ll smash it with a mixing drill + paddle, stainless trowels (large for fields, small for edges), a hawk, 120–240 grit abrasives, a straightedge for checks, roller with microfibre sleeves for primers and sealers, tight masking, a HEPA vacuum, moisture meter, scales, and solid buckets. Materials that actually matter: a substrate‑specific primer, fibreglass mesh, microcement base (coarse), microcement finish (fine), pigments, and a water‑based PU sealer (or acrylic), with optional wax if you’re chasing a soft sheen. Safety isn’t negotiable: FFP2 mask, gloves, eye protection, and dust extraction when sanding. Work like a pro—one clean, labelled bucket per product, weigh every mix, and lock your water/pigment ratios so the colour doesn’t wander. Pot life sits around 60–90 minutes, so mix smaller batches and keep it fresh. Real-world note: a 12 m² feature wall with two base coats plus one finish coat wants ≈28.8 kg base, 7.2 kg finish, 2.4 L sealer, and 18 m² mesh—no guesswork, just maths. Case study, compact flat hallway: contractor used the exact list above, stuck to weighed mixes, and shaved a full day off the programme while hitting a consistent industrial microcement finish with zero patchiness.
| Item | Typical coverage per coat | Coats | Example qty for 10 m² |
| Primer | 0.15 kg/m² | 1 | 1.5 kg |
| Mesh | 1.05 × wall area | 1 | 10.5 m² |
| Base microcement (coarse, ~1 mm) | 1.2 kg/m² | 2 | 24 kg |
| Finish microcement (fine, ~0.5 mm) | 0.6 kg/m² | 1–2 | 6–12 kg |
| Sealer (water‑based PU) | 0.1 L/m² | 2 | 2 L |
Mix ratio call‑out (keep it repeatable): Base coat: 1000 g powder : 280–320 g water (+ pigment paste as specified, e.g., 20–30 g/kg). Finish coat: 1000 g powder : 260–300 g water (same pigment rate). Aim for peanut‑butter to yoghurt viscosity—slick enough to spread thin, stiff enough to hold the trowel’s movement. Batch by grams on scales, note your water/paste weights on the bucket, and lock that routine from first scoop to last. Case study, high-traffic family kitchen: installer stayed within these ratios, ran HEPA extraction with 180‑grit between coats, and the microcement wall shrugged off splashes and scuffs after a 2‑coat PU sealer—no colour drift, no edge lap marks, just a tight, matte, wipeable surface.
Prep Like a Pro: Cleaning, Repairs, Primers, and Mesh
Mask meticulously — ceilings, floors, sockets, skirtings, and switches — then vacuum and degrease walls so the microcement actually bonds instead of skating on grime. Strip silicone and scrape off loose paint. Key glossy paint and tiles (80–120 grit) until they’re uniformly dull, then vacuum again. For repairs, pack holes and gouges with a polymer‑modified filler; for movement lines or hairline fractures, bridge cracks with alkali‑resistant mesh and the right repair mortar. Now the substrate picker: 1) Dry plaster/paint: apply a thin, even acrylic grip primer. 2) Plasterboard/cement board: primer plus a full‑surface mesh to tame joints and prevent ghosting. 3) Tiles: roll on an epoxy or high‑bond primer and broadcast sand for tooth; total coverage is non‑negotiable. 4) Concrete: consolidate any friable patches and use a penetrating primer if it’s dusty. Embed a full‑surface mesh in the first base layer (or approved binder), overlap 5–10 cm, and wrap corners so edges don’t telegraph through your finish. Respect drying times by the book and hold the room at 18–25°C, 40–60% RH — no heaters, no fans, no shortcuts.
Case studies that prove the point: a high‑traffic hallway with glossy emulsioned walls was keyed to a matte, primed with an acrylic grip primer, then fully meshed; twelve months on, the microcement wall still looks box‑fresh with zero hairlines. A bathroom tile refit used epoxy primer + sand broadcast and mesh at corners; adhesion pulled tiles before the coating let go during a test, which is exactly what you want. And a dusty basement concrete wall? After consolidation and a penetrating primer, the base coat bonded cleanly and cured without blush. Follow this sequence and your microcement application stops being a gamble and starts behaving like a system built to last.
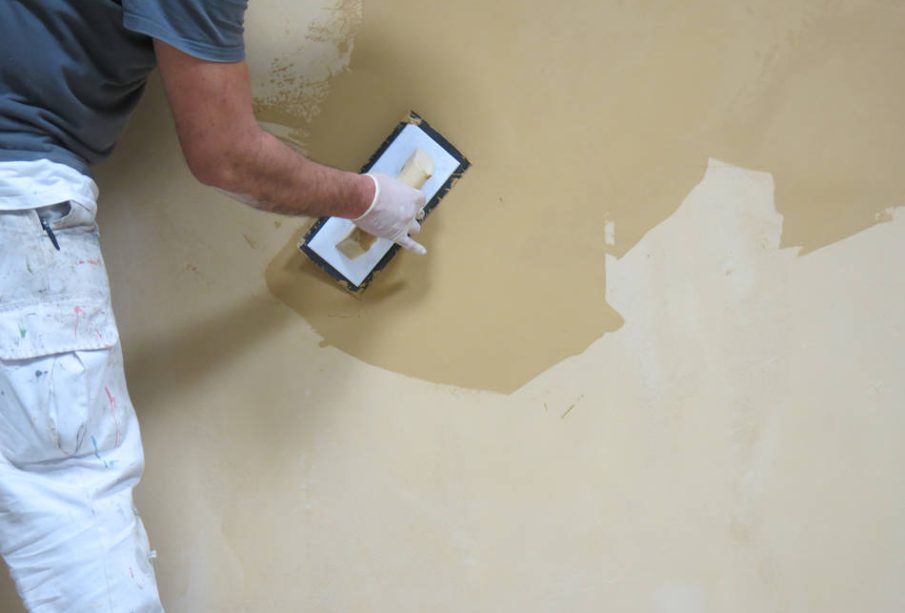
Apply Base and Finish Coats: Trowel Techniques for Seamless Walls
Work clean and controlled or the wall will fight back. Aim for 18–25°C and 40–60% RH, lights consistent, no drafts, and only mist seriously thirsty substrates. Lay Base Coat 1 as a tight skim at ~1 mm with a 10–20° trowel angle and moderate pressure; embed mesh where specified. Leave it even, not glossy. Let it dry properly, then sand 120–180 grit to knock back ridges and vacuum the dust. Follow with Base Coat 2 at another ~1 mm, blend overlaps, keep a wet edge, and avoid heavy burnish. Lock in colour consistency by using pre‑weighed pigment, mixing enough for the whole wall, and boxing batches so tone doesn’t drift mid‑panel.
Switch to the finish coat at 0.3–0.5 mm with lighter pressure and pick your texture deliberately: for smooth microcement walls, use long, shallow passes in one direction; for a clouded finish, cross‑pass with subtle pressure changes; for a linear look, run consistent strokes top‑to‑bottom. Hit edges and corners with a smaller trowel, protect adjacent surfaces, and soften lines while the coat is still green. Respect recoat times; if the surface feels cool, it’s not ready—wait until it’s matt and neutral to the touch. Do a final sand 180–240 grit for touch and uniformity, and don’t polish up shiny patches before sealing. Technique cheat‑sheet: trowel angle 10–20°, base coats ~1 mm each, finish 0.3–0.5 mm, light sand between coats, vacuum dust, and keep lighting steady so every pass stays seamless and undefined edges don’t telegraph through your microcement.
Go to the store and buy microcement: https://festfloor.com/
Seal, Cure, and Maintain: Protecting Your Finish for Years
Choose the right sealer for the room or you’ll sabotage that flawless microcement wall. For living areas, go with a water‑based polyurethane (PU), 2–3 thin coats, in matt or satin to keep the texture real. In bathrooms and toilets, step up to a high‑performance PU or an acrylic + PU system, and add an extra coat in splash zones like around basins. Apply with a microfibre roller, lay down thin coats, leave 2–3 hours between coats, and de‑nib with 240‑grit if it feels rough. Watch your edges—no pooling, no drips. Curing matters: protect from moisture and abrasion for 72 hours, allow light use after 3–5 days, and expect full cure at around 7 days (check the product data sheet). During the first week: no wet cleaning, no adhesive hooks or tape, and keep a gentle airflow for ventilation.
Clean and maintain smart to keep that finish sharp. Use a pH‑neutral cleaner with a soft cloth; avoid bleach, ammonia, and abrasive pads. Inspect quarterly for scuffs and traffic patterns; in high‑use areas plan a topcoat refresh every 2–3 years. Small battle scars? Lightly sand and locally reseal. Quick fixes: dull patches mean under‑sealed—add a coat; streaks point to over‑rolling—sand and recoat; water marks suggest premature wetting—let it dry, then apply a light seal coat. Do/Don’t: Do use thin, even coats, follow recoat windows, and stick to manufacturer specs. Don’t flood the roller, don’t steam‑clean, and don’t rush the cure. Maintenance schedule: Weekly pH‑neutral wipe; Quarterly inspection; Every 24–36 months topcoat in high traffic. Case studies: A family hallway kept a matt PU fresh with a 24‑month reseal cycle—no greying, no peeling. A small shower room using an acrylic + PU system with an extra splash‑zone coat stayed stain‑free and water‑tight after 18 months of daily use.